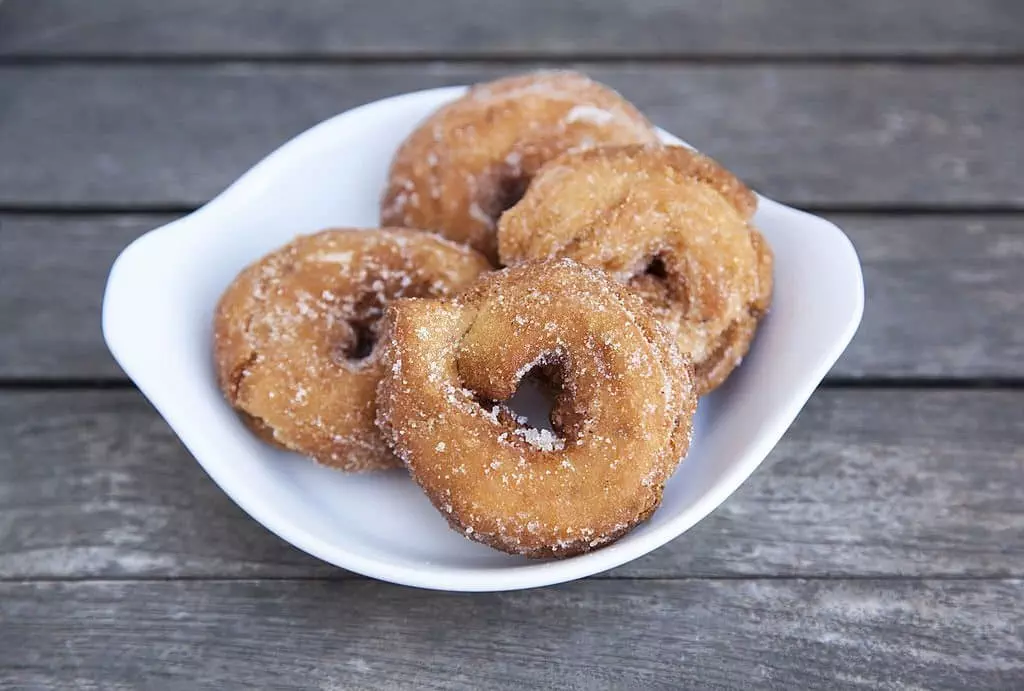
Spanish rosquillas are a beloved traditional pastry that has been enjoyed for centuries. These ring-shaped treats, similar to donuts but with a unique texture and flavor, are especially popular during holidays and local festivals such as Semana Santa and San Isidro in Madrid. Unlike American donuts, rosquillas come in texture variations, some light and airy, others dense and crunchy, each with its distinct preparation method.
What makes rosquillas special is their versatility. Some are fried to achieve a crispy, golden-brown exterior, while others are baked for a slightly lighter texture. Classic flavors include anise, lemon, and cinnamon, but many modern variations have emerged. Whether you enjoy them plain, dusted with sugar, or covered in a sweet glaze, rosquillas are a delightful treat that captures the essence of Spanish home baking.
Table of Contents
The History of Spanish Rosquillas: A Sweet Journey Through Time
The origins of rosquillas can be traced back to ancient Mediterranean civilizations, where similar circular-shaped pastries were enjoyed. Over time, these treats made their way to the Iberian Peninsula and became a popular delicacy in Spain. The word “rosquilla” comes from the Latin term “rotae,” which means “wheels” or “rings.”
Variations on a Classic: Exploring Different Spanish Rosquillas Types
While the traditional rosquillas recipe is widely loved, regional variations have emerged throughout Spain. Here are a few notable variations:
- Rosquillas de Santa Clara: Originating from Moguer, these rosquillas are made with almonds, cinnamon, and lemon zest, giving them a unique flavor profile.
- Rosquillas de San Isidro: These rosquillas, hailing from Madrid, are often made with anise liqueur, creating a distinct taste. They are typically glazed with a sugar coating.
Tips and Tricks for Perfect Spanish Rosquillas Every Time
- Rest the dough: Allowing the dough to rest for 30 minutes before shaping the rosquillas helps improve its elasticity and results in a lighter texture.
- Maintain the oil temperature: When frying the rosquillas, ensure the oil is at the right temperature (around 350°F/180°C) to achieve even browning and prevent them from becoming greasy.
- Glazing technique: Dip the rosquillas into the glaze while still warm. This allows the glaze to adhere better. Place them on a wire rack to allow excess glaze to drip off.
FAQs About Rosquillas
- What are rosquillas?
Rosquillas are Spanish-style donuts, typically fried or baked, with different textures and flavors depending on the region. - What are the main types of rosquillas?
The most common varieties include rosquillas listas (glazed), rosquillas tontas (plain), rosquillas de anís (anise-flavored), and rosquillas de Santa Clara (meringue-covered). - Are rosquillas the same as donuts?
No, rosquillas are denser and often have a more rustic texture compared to American-style donuts. - Can rosquillas be baked instead of fried?
Yes! While traditional rosquillas are fried, some modern versions are baked for a lighter option. - How do you store rosquillas?
In an airtight container at room temperature for up to three days or in a freezer for longer storage.
Related Spanish Recipes
- Churros – Crispy fried dough often paired with hot chocolate.
- Pestiños – Andalusian honey-glazed pastries.
- Buñuelos – Light, airy fritters with sweet or savory fillings.
- Torrijas – Spanish-style French toast, often soaked in milk and honey.
Conclusion
Rosquillas are more than just a sweet snack—they are a piece of Spain’s culinary heritage. Whether you prefer the simplicity of rosquillas tontas, the sweetness of rosquillas listas, or the aromatic touch of anise in rosquillas de anís, there’s a version for every taste. These traditional pastries have been passed down through generations, often made using family recipes that bring people together in the kitchen.
If you’ve never tried making rosquillas at home, now is the perfect time to start. They require simple ingredients and can be adapted to your preference—fried or baked, glazed or plain. No matter how you enjoy them, rosquillas offer a delicious way to experience authentic Spanish flavors and traditions. So why not bring a taste of Spain into your home and try making a batch today?
Spanish Rosquillas: 3 Incredible Tips for a Perfect Recipe
Ingredients
- 2 cups All purpose flour
- ½ cup Granulated Sugar
- ½ tsp Baking powder
- ¼ tsp Salt
- 2 Large eggs
- ¼ cup Olive oil
- ¼ cup Milk
- Zest of 1 lemon
- Vegetable oil for frying
For the Glaze
- 1 cup Powdered sugar
- 2-3 tbsp Lemon juice
Instructions
- In a large mixing bowl, combine the flour, granulated sugar, baking powder, and salt. Mix well.
- In a separate bowl, beat the eggs lightly. Add the olive oil, milk, and lemon zest. Whisk together until well combined.
- Pour the wet ingredients into the bowl with the dry ingredients. Stir until a dough starts to form. Use your hands to knead the dough until it becomes smooth and elastic.
- Cover the dough with plastic wrap and let it rest for about 30 minutes.
- After the resting period, take small portions of the dough and roll them into thin ropes, about 1/2 inch thick. Join the ends of each rope to form a ring shape. Repeat until all the dough is used.
- In a deep pot or skillet, heat vegetable oil over medium heat. The oil should be about 2 inches deep.
- Carefully place a few rosquillas into the hot oil and fry until they turn golden brown on both sides. Make sure to flip them halfway through for even cooking. Remove the fried rosquillas using a slotted spoon and place them on a paper towel-lined plate to absorb any excess oil. Repeat until all the rosquillas are fried.
- Once the rosquillas have cooled slightly, prepare the glaze. In a small bowl, whisk together powdered sugar and lemon juice until you get a smooth, pourable consistency.
- Dip each rosquilla into the glaze, ensuring they are well coated. Place them on a wire rack or a plate to allow the glaze to set.
- Let the rosquillas sit for about 15-20 minutes until the glaze hardens. They are now ready to be enjoyed!