
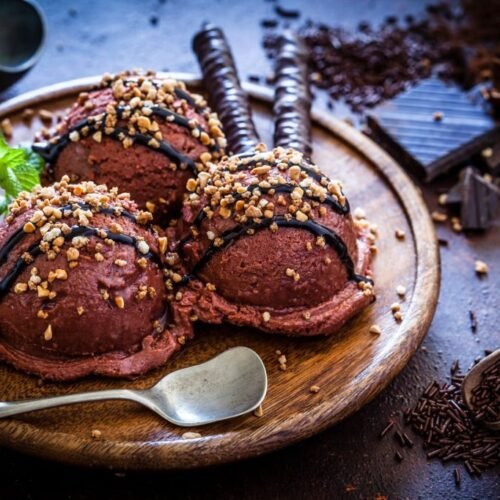
There’s something timeless and comforting about a bowl of homemade chocolate ice cream. It’s the kind of treat that brings back memories of summer days, birthday parties, or just a quiet moment of indulgence. While store-bought options are convenient, nothing compares to the deep, velvety flavor of homemade chocolate ice cream. This simple, beginner-friendly recipe delivers that perfect creamy texture without any artificial ingredients.
Whether using an ice cream maker or going the no-churn route, you’ll be surprised by how easy it is to get professional-quality results in your kitchen. With just a few pantry staples and a little patience, you’ll have a rich, smooth dessert that beats anything you can find in the freezer aisle. Let’s start making your new favorite chocolate ice cream from scratch.
Table of Contents
Variations of Chocolate Ice Cream
The beauty of homemade chocolate ice cream lies in its versatility and the ability to customize it to suit individual preferences. There is an array of exciting variations to explore.
Dark Chocolate Ice Cream
Use high-quality dark chocolate (70% or more) instead of cocoa powder for an intense, bittersweet flavor.
Chocolate Chip
Fold in mini chocolate chips or chopped chocolate chunks before freezing for added texture.
Spicy Mexican Chocolate
Add a pinch of cinnamon and a dash of cayenne pepper to the mixture for a bold, warming twist.
Mocha Ice Cream
Mix in 1–2 teaspoons of instant espresso powder to combine the richness of chocolate with a subtle coffee kick.
Vegan Option
Swap heavy cream and milk for full-fat coconut milk and use maple syrup or agave instead of sugar.
Nutty Chocolate
Stir in crushed toasted hazelnuts, almonds, or pecans for crunch and nutty flavor.
Tips and Tricks for Making Easy Homemade Chocolate Ice Cream
Creating a batch of delicious homemade chocolate ice cream is simple and rewarding. Homemade chocolate ice cream is a timeless treat that allows for creativity and personalization. With its intriguing history, a multitude of variations, and helpful tips and tricks, crafting this delectable dessert at home has never been easier.
- Chill the mixture: Let the chocolate base chill in the fridge for at least 4 hours (ideally overnight) before churning. This helps with texture and flavor development.
- Don’t skip the salt: A pinch of salt enhances the chocolate flavor and balances the sweetness.
- Use quality cocoa: The better the cocoa powder or chocolate, the richer your ice cream will taste.
- Alcohol for softness: A tablespoon of vodka or coffee liqueur can help prevent the ice cream from freezing too hard.
- Freeze container ahead: Pre-freeze your storage container to help the ice cream set faster and stay smooth.
- Cover with parchment: Place parchment paper directly on the ice cream before sealing to prevent ice crystals from forming.
Frequently Asked Questions
Can I make this without an ice cream maker?
Yes, you can. Simply freeze the mixture in a shallow container and stir every 30 minutes until creamy.
How long does homemade ice cream last?
Store it in an airtight container in the freezer for up to 2 weeks for the best flavor and texture.
Can I use dark chocolate instead of cocoa powder?
Absolutely. Melted dark chocolate adds a deeper flavor, just be sure to adjust the sugar to taste.
Related Spanish Dessert Recipes
- Tarta de Santiago – Almond cake from Galicia, naturally gluten-free
- Flan de Huevo – Classic Spanish egg custard
- Natillas – Creamy Spanish-style vanilla custard
- Churros con Chocolate – Fried dough sticks with thick hot chocolate
Conclusion
We hope you loved this rich and creamy chocolate ice cream recipe. If you try it, comment below and let us know how it turned out! Want more delicious recipes like this? Subscribe to our newsletter and never miss a new post.
Homemade Chocolate Ice Cream: Made Easy
Equipment
- Ice Cream Maker Optional
Ingredients
- 2 cups Heavy cream
- 1 cup Whole milk
- ¾ cup Granulated Sugar
- ¼ cup Unsweetened cocoa powder
- 4 oz Semisweet chocolate chopped
- 4 Large egg yolks
- 1 tsp Vanilla extract optional
Instructions
- In a saucepan, combine the heavy cream, milk, sugar, and cocoa powder. Place the saucepan over medium heat and whisk the mixture until the sugar and cocoa powder are fully dissolved.
- Add the chopped chocolate to the saucepan and continue whisking until the chocolate is completely melted and the mixture is smooth. Remove the saucepan from heat.
- In a separate bowl, whisk the egg yolks until they are well beaten. Slowly pour about 1/2 cup of the warm chocolate mixture into the egg yolks, whisking constantly to temper the yolks and prevent them from curdling.
- Pour the egg yolk mixture back into the saucepan with the remaining chocolate mixture, whisking constantly.
- Place the saucepan back over medium heat and cook the mixture, stirring continuously, until it thickens slightly and coats the back of a spoon. This should take about 5-7 minutes. Do not let it boil.
- Remove the saucepan from heat and stir in the vanilla extract. Let the mixture cool for about 10 minutes at room temperature.
- Transfer the chocolate mixture to a container or bowl, cover it with plastic wrap (make sure the plastic wrap touches the surface of the mixture to prevent a skin from forming), and refrigerate for at least 4 hours or overnight.
- Once the mixture is thoroughly chilled, pour it into an ice cream maker and churn according to the manufacturer's instructions. This usually takes about 20-30 minutes.
- Transfer the churned ice cream to a lidded container and freeze for an additional 3-4 hours, or until firm.
- Serve the chocolate ice cream in bowls or cones, and enjoy!